Trailer Mk III

Apologies for the limited availability of this page over the last few days - too many pics, too many visitors. Have now shrunk the pics and distributed their hosting over several servers - let's see if that helps. Peter
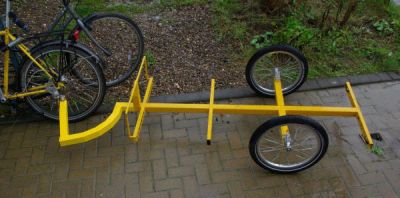
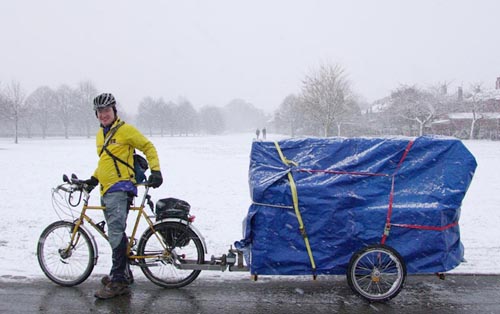
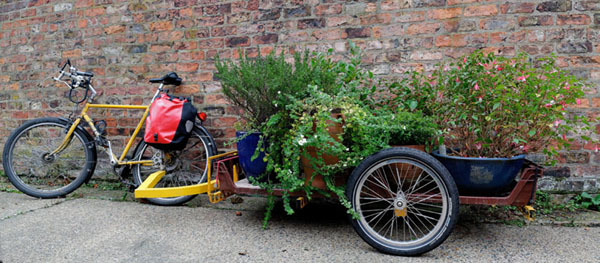
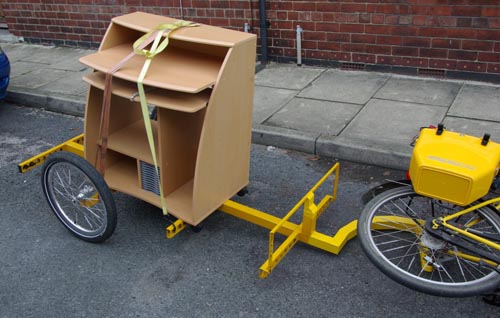
This is the third trailer I built, this one finally with welding and decent machining facilities. It was mainly designed to carry review bikes (usually in boxes) being tested for write-ups in Velo Vision Magazine from the office (where they're delivered) to home, where I usually assemble and store them while I do the reviews. But also for general purpose use - I don't drive, so a big bike trailer is handy for all sorts of things - taking loads to the tip or recycling depot, moving large stuff (washing machine, fridges etc), helping other people move house (moving sofas etc - saves hiring a van), etc etc. Sorry for water droplets - many pictures taken in the rain!
With the new hitch it tows really well! As of August 2008 as I write this, it's helped with a house move and carried its first review bike across town, no problems so far!
Skip to:
You may also want to check out the first and second trailers I built, using just hand tools. Note that the second one has a hitch which does pretty much everything this new one does, but made with just a drill and hacksaw :-). So don't let lack of major workshop facilities put you off :-)
Design specification
- Less than 1 m wide overall (I think that's a legal limit in Europe. Not sure about UK, but may as well play safe in case we get 'harmonised').
- Easily carry bike boxes up to 2m long
- Safely carry (on edge) 4' x 8' sheets (1.2 x 2.4m)
- 150kg+ capacity
- Low c of g
- Plenty of solid tie-on points
- Potential to add brakes and/or electric assist.
- Not too much left on bike when not towing
- Lockable to bike for when leaving it parked
- Easy/quick/affordable to manufacture - I find it hard to get time away from the day job and other commitments to work in the shed!
Trailer features:
- MIG welded.
- Made from mild steel section (ERW aka seam welded) 50x50x1.5 or 50x25x1.5.
- Both cross and main beams are continuous (ensuring alignment and not relying totally on welds in tension) - notches half way through each allow joints to lay flush.

- Holes in cross-beams are to create tying-on points as well as for weight reduction
- Additional tying on points on axle support blocks made from angle aluminium:

- Axle support blocks not a good design, but work. (Over-heavy, bolts don't pinch axles properly as square section compresses, not QR, bulky and sharp edges may damage loads).
- Initially painted with red oxide primer and yellow enamel - this not very successful, hard to get even coverage. Required lots of coats.
- New drawbar painted with smooth yellow Hammerite, three coats.
- Wherever possible, interior sprayed with Waxoyl to prevent corrosion.
- Wheels were bought at CycleVision years ago. 1/2" wheelchair axles.
- Tyres are Schwalbe Big Apple 60 x 406s for high load capacity, bit of cushioning and low rolling resistance.
- For bike box and big loads just use bare chassis. For smaller stuff, two bread baskets attach using bungees and a cunningly shaped block of wood...)
- Large cable ties through holes in rear beam provide resilient mounts for rear lights - below load plane, but will just flip up without damage if they hit the road:

- Overall weight with new drawbar approx 17.5 kg
New hitch features
- Turn approx 90 degrees right, 100 degrees left.


- Up/down pivot motion 180+ degrees, so can roll bike around vertically on its back wheel no prob, occasionally handy in restricted areas.
- Lay bike flat for stable loading either left or right. Left is better (bike on top, trailer hitch stable on the ground):


but lay-to-right capability may be handy in restricted space. Designed to make sure drawbar can't damage the disk brake or spokes - it butts up against either the dropout edge or axle nut:


- All stainless steel axles running in bronze bushings.

Actually, the bushings are mystery yellowish-looking metal, could also be brass. I'm hoping bronze, but with very low speed rotation and loads wear should not be an issue. Lubricated with copper grease, too. Housings are aluminium offcuts, grade unknown.
- All joints are pre-tensioned via O-rings compressed slightly along the axles.

This ensures no rattles, and also prevents the hitch joints flopping around annoyingly when you're attaching or detaching it. Stainless washers provide nice bearing surfaces (polished with fine emery :-) so should be no sliding on the O-rings themselves.
- All changes of diameter of the axles have wide radiuses to avoid stress concentrations. These are hidden either under O-rings or via generous chamfering.
- Axles secured by M8 s/s bolts with threadlock
- For additional safety vertical and horizontal axles intersect within their housing slightly - a groove on the vertical post permits this. So even if the M8 threadlocked bolt at the top of the vertical pivot post came out, the axles wouldn't separate.
- Drawbar is 50mm x 1.5mm square section steel, same as rest of the trailer main beams. Wanted to make it really solid: flex in the drawbar can definitely affect the handling, causing fore-and-aft 'pulsing' under load. This won't flex a lot! Wedges cut out and beam bent, then welded.

- Trailer is close to centred behind vertical pivot post on hitch - ensures even traction so no wheel scrubbing. But it is offset around 125mm (5") to the side of the bike.


If not using a disk or drum brake on the rear wheel, the mounting plate could possibly be mounted inside the stays rather than outside, reducing the offset. Not that it's been a problem in practice, so far.
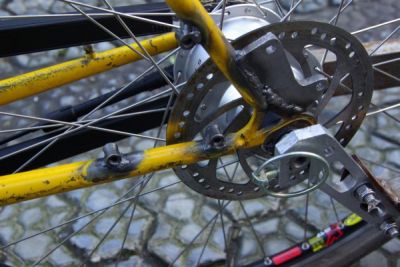
- The mounting plate requires three M6 threaded bosses on the frame.
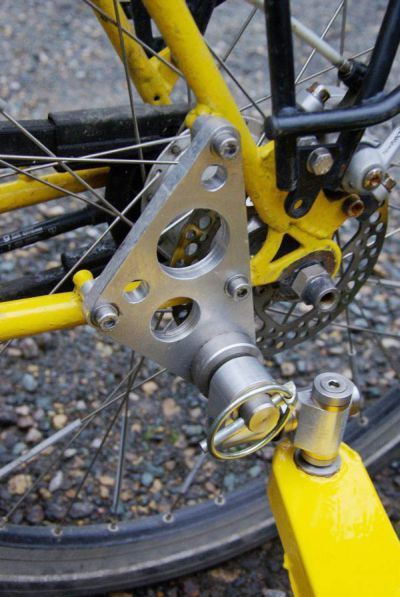
In my case these were rather crudely welded on while I was also welding on a disk brake mount:
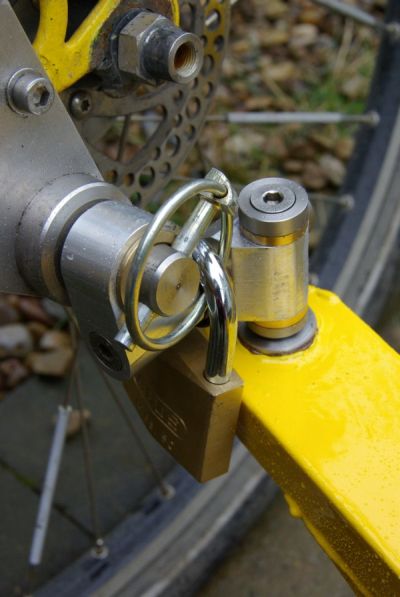
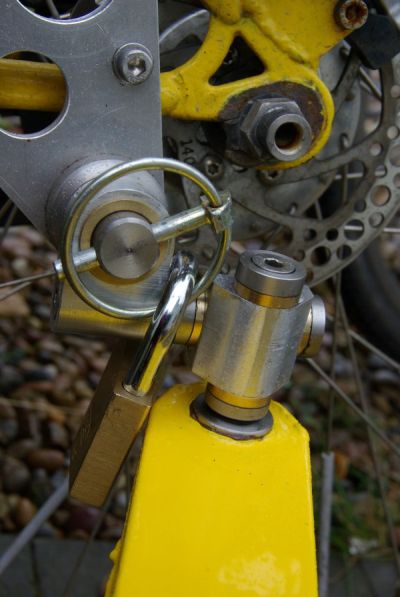
- Trailer attaches via a 1/4" locking pin - inserting it slightly compresses the O-ring at the end of the stub axle. Head rests neatly on the bushing. This is what's left on the bike when trailer is detached:
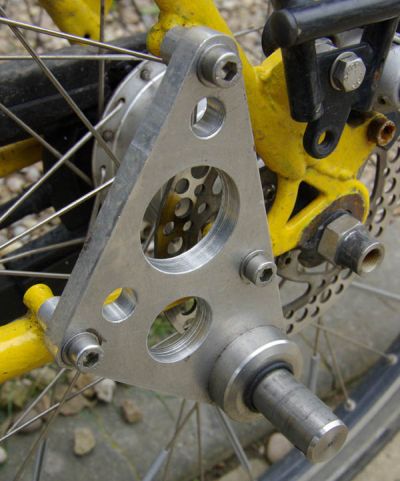
- Stub axle on mounting plate is 18mm (for easy insertion and robustness). Stainless steel. Hollow except for the very end where the pin passes through. Attached to mounting plate with 5 off M5 s/s SHCS (probably overkill :-)
- Trailer can be locked to the bike via a padlock through the pin and around the hitch. Not a great system - I think the padlock will scratch the paint if you try pivoting it too far like this, and also it's actually not hard to detach the spring from the pin if you have strong fingers. But it's a bit of security against casual theft when the bike and trailer are parked up in public, anyway:
Improvements for next time:
- Improve locking feature for hitch.
- Probably a retracting-ball hitch (like hydraulic/air quick-release fittings)
- Use standard axle and bushing sizes for hitch so can buy off-the-shelf bushings.
- Better axle support blocks and mounting system. Use 20mm through-axles or maybe QR wheelchair hubs.
- Add disk/drum brakes for trailer braking (balancing and how to actuate them still open issues)
- Better quick-release for baskets/load bed
- Possibly a structure around/over the rear wheels, so large flat loads can lay flat.
- Make a removeable (bolt-on?) upright support to provide better tying-on security for flat loads carried on edge. Will also help with the more floppy sort of bicycle box!
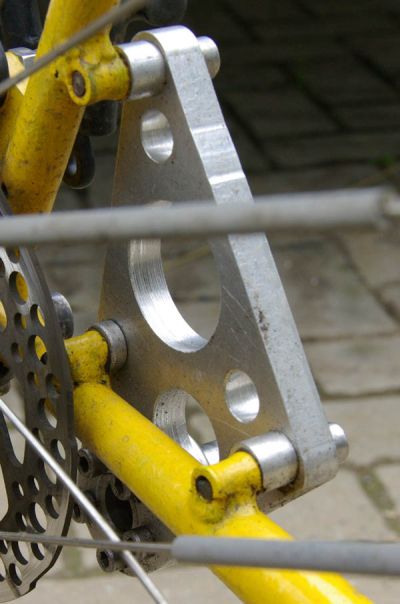
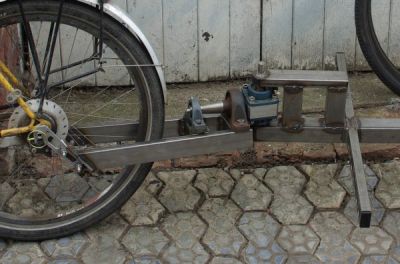
Notes on a failed hitch design
Before developing the hitch described above, I built the trailer originally with another, more elaborate swivel system. This turned out to be a failure, which became apparent on the very first test-ride. For this reason it was never painted - I knew it was going to be hacksawed off - but it took me close to a year to get around to making the replacement drawbar. So you'll see the old design on many of the 'load gallery' pics below.
The idea of the original hitch was appealing for several reasons, mainly its symmetry, robustness and wide turn angles in all directions (and a certain 'nobody else has one of these!'). But the handling was just awful: that long lever arm out the back of the bike shoved the rear end around continuously, requiring a strong, heavy rider (and well pumped up back tyre) to keep oscillations in hand. It was OK unloaded, but loaded required journeys more or less at walking pace to feel safe. Hence the new hitch, which is essentially a tarted up version of that used on my second trailer.
So don't build one like this! But for reference, a list of pros and cons of the design:
PROs
- Uses very robust bearings I had to hand, found very cheap :-)
- Can lay bike down either side at any angle, or roll it along on back wheel etc
- 100 degrees turn each side
- Panniers can be carried both sides & still lays down - good for adding weight to rear wheel.
- Minimal stuff left on bike, just the replacement axle nuts. Easy to make new nuts for more bikes (though a pain when each hub gear has a different thread...).
- Symmetrical bike loading at strongest point of existing structure (dropouts). No need for added mounting points.
- No play in hitch
- No twisting on trailer chassis due to off-centre hitch.
- Easy to attach and detach with no tools, just hook it on and push two pins through to lock. Pins snap over extended axle nuts so can't fall out.
- Trailer tracks well round sharp curves - turn pivot central and behind back wheel of bike.
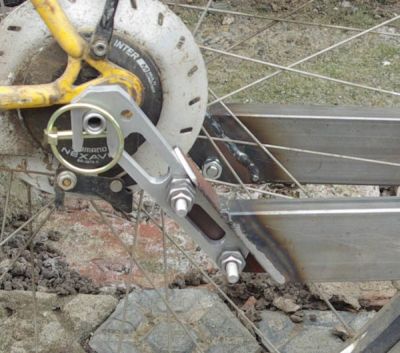
- Yoke adjusts for width for differing bike rear axle lengths (using spacers).
- Alternate yoke plate positions for 26" and 20" wheels. For a towing bike with 20" back wheel, the aluminium yoke plates attach via the central and top holes, rather than middle and bottom as shown for 26" wheels. This keeps the trailer level.
CONs
- Handling - the 'turn' pivot being behind the rear wheel means that towing forces, especially when cornering, have a considerable lever arm to affect bike handling. Also, any direction change of the towing bike must shift the front of the load bed sideways, which if it's heavy is not good - you'll have to fight the load's inertia with the bike steering. This is the killer flaw, and made riding with the trailer even when empty unnerving. OK when really slow, but not good.
- Heavy - very! (especially as built in this prototype, could be a fair bit lighter, but the design puts pivots at a location where they are fairly highly loaded and also have to be compact, so some extra weight is inevitable). Weight with this hitch was around 24 kg, some 7 kg more than with the new drawbar and hitch.
- Long - pivots etc extend trailer load bed out behind back wheel (but can be handy for very long loads)
- Floppy hitch bit was awkward when lifting the trailer through doors etc.
- Height of hitch etc reduces flat area of load bed, requires additional structure.
- Two spring pins to lose/fiddle with instead of one...
- Yoke can swivel right up around the back wheel and destroy the back light if you lay it down at the wrong angle.
Loads carried gallery


|
|